Black Moshannon Creek
Gorton Road to Rt. 53 Bridge(Black Mo)
| Difficulty | III |
| Length | 3.3 mi |
| Avg Gradient | 70 fpm |
| Reach Info Last Updated | May 11, 2022 |
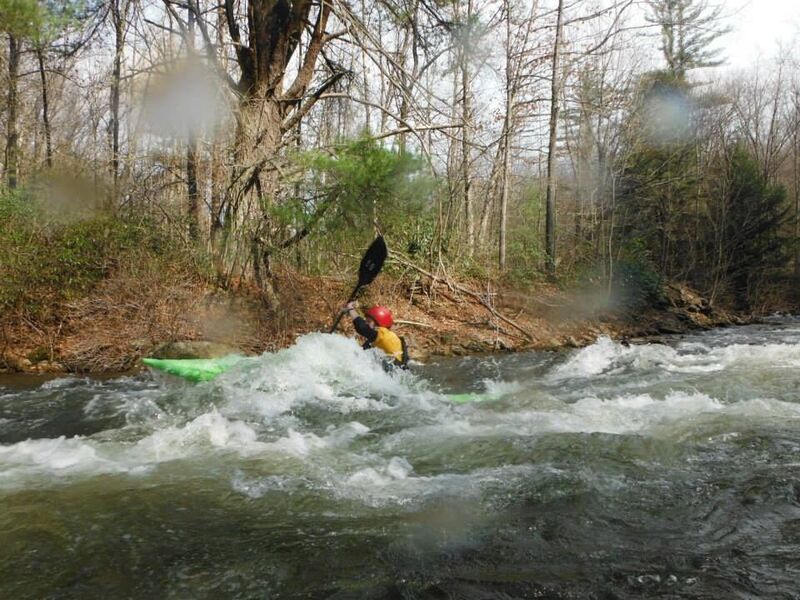
The Black Moshannon Creek is one of Pennsylvania’s hidden gems, running occasionally in the spring with a combination of snowmelt and rain. The run and the shuttle are both fairly short, so many boaters choose to run multiple laps in a day if they can.
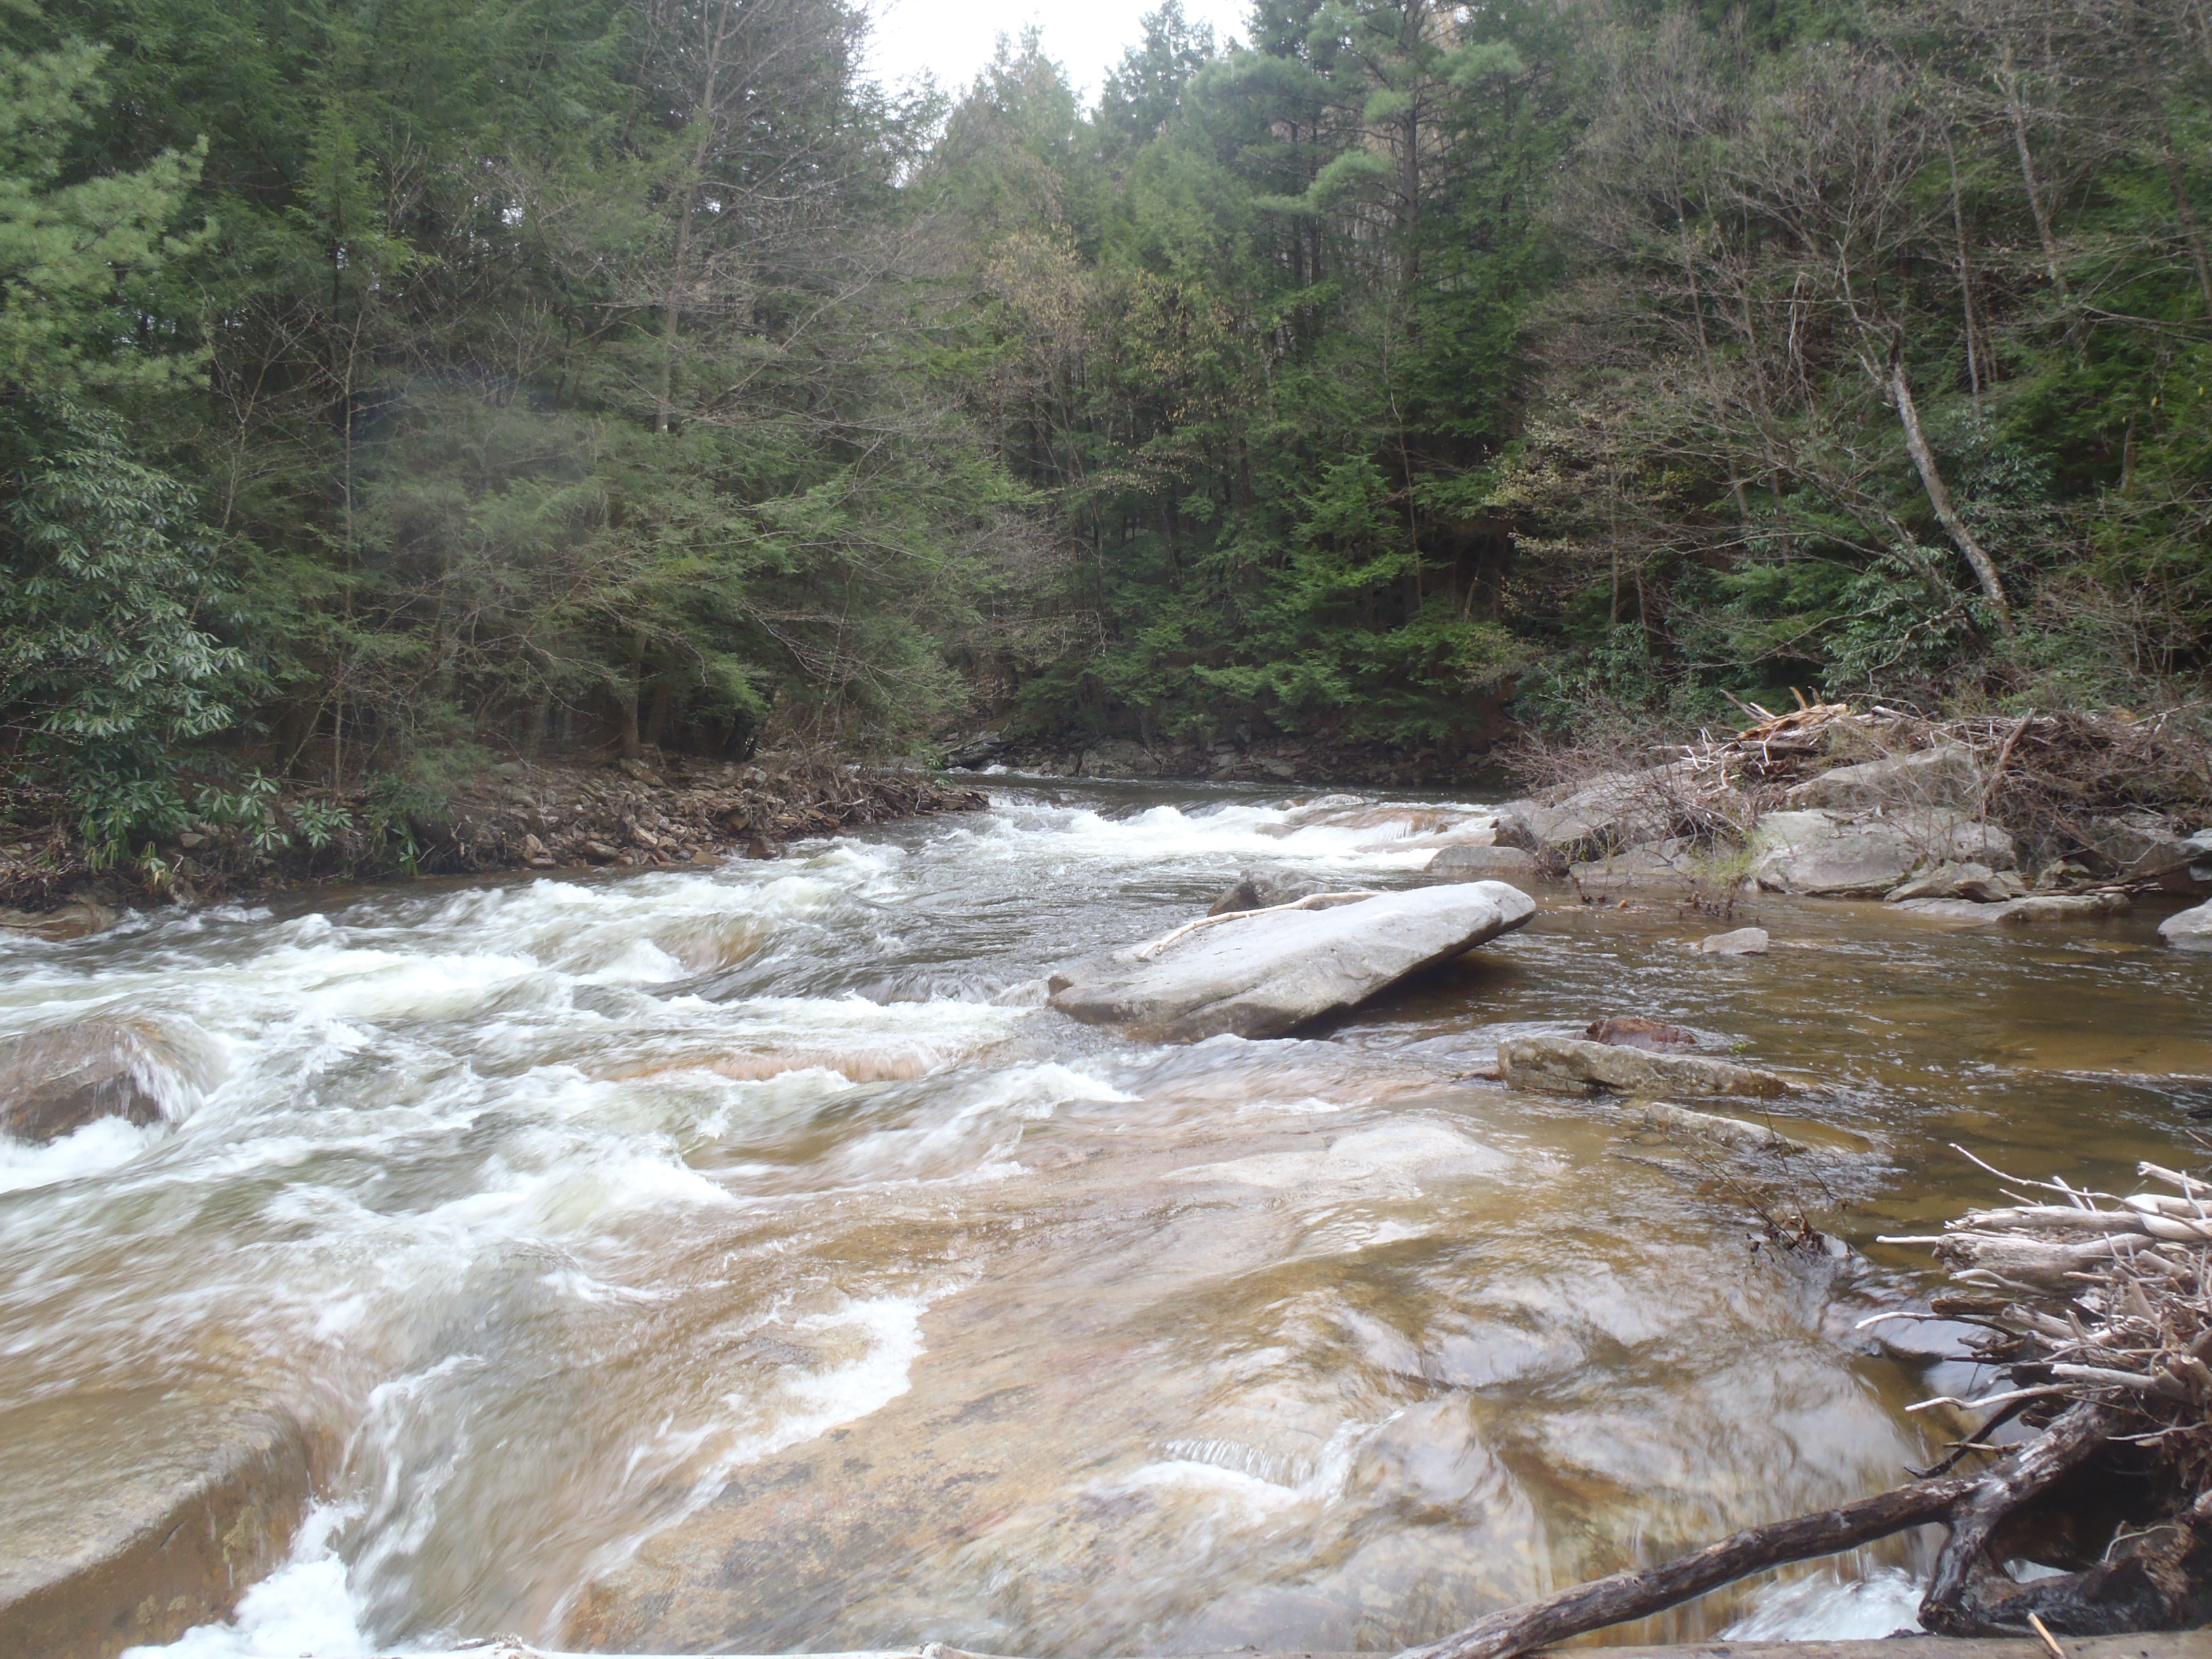
Hazards This section can sometimes collect wood around blind turns. Be on the lookout for strainers in fast water.
Gauge There is no USGS gauge for this section. You need to look at the gauge marks on the bridge abutment at the put-in. Note that the white, metal gauge there is graded in tenths of a foot, not inches. 0.0' to 0.4' is about minimum, depending on who you ask. 0.4' to 1.0' is fun Class III. Above 1.0' and the run starts to get fairly continuous, with few pools, smaller eddies, and the water up in the rhododendrons lining the creek. Around 1.5' and above, one could call this creek a 3.3 mile long Class IV rapid.
Put-in From I-80 East: Take Exit 147 to Snow Shoe. Make a left onto PA 144, where you will drive until the town of Moshannon. Once in Moshannon, turn left onto Gorton Road at the intersection between PA 144 and PA 53. Stay on Gorton Road until you reach the one lane bridge across the Black Moshannon Creek. Parking can be found on both river right and left.
From I-80 West: Take Exit 133 to Kylertown. Make a left onto Route 53 and stay on 53 until the town of Moshannon. There, make a right onto Gorton Road at the intersection between PA 53 and PA 144. Stay on Gorton Road until you reach the one lane bridge across the Black Moshannon Creek. Parking can be found on both river right and left.
Takeout From I-80 East: Take Exit 147 to Snow Shoe. Make a left onto PA 144, where you will drive until the town of Moshannon. Continue straight at the intersection between PA 144 and PA 53 until you reach the Route 53 bridge across the Red Moshannon Creek. Parking can be found on both sides of the bridge.
From
...A small warm-up pool of varying depths appears at the put-in, followed by a short wave train under and past the bridge.

First real rapid so-to-speak. The creek turns right through a double drop sequence of sorts. At lower levels, right side or left side work best. At medium to high flows, anywhere is fine. A wave train follows afterward, which can provide decent surfing at medium flows.
This is the first of the Black Mo's characteristic sharp turns. The rapid begins with a slight left turn into a drop with a fluffy but easily punchable hole. There's a large eddy on the right side where most eddy out to set up for the sharp left turn. Ferry out far to the left to make the inside of the turn and continue through the next set of waves and offset holes. Or, for added challenge, one can also eddy out in Coon Eddy itself behind the large rock on the river right side of the bend, and subsequently ferry back into the main flow above the rock.
Also known as Judge's Camp or Judge's Cabin, this rapid begins with a large table rock with flow channelizing around both the right and left side. At levels of 7' or higher, one can paddle over top of the table rock. After the table rock, there's a short boulder garden before the channel opens up into a wavetrain with eddies on either side. The creek makes a slight left-hand bend into the surf wave known as Swimmers.
This is the surf wave at the bottom of Frisbee. At low to medium flows, it's a popular surf spot and a great place to practice attainments. At high flows, the river right eddy below the wave becomes a whirlpool with a strong eddy wall. There have been instances of paddlers who went into that eddy at 15' and above and found their best exit strategy was to climb out via the somewhat steep shoreline. In the rare event that levels get that high, beware of this eddy.
The river makes a sharp right-hand turn not far below Swimmer’s. At the end of the turn lies Black Hole, a nearly river wide and sticky hydraulic that can either be snuck on the right or left or, at low levels, punched through the center. Above 1 ft, this hole can ender creek boats.
A sharp right turn with a small swirly eddy river left halfway through the turn. A small pourover rock backs up the bottom of the eddy, with everything else river right channelizing into a long wave train with a couple of punchable offset holes at the bottom.
An even sharper right turn with an even larger swirly river left eddy. Getting into the eddy is easy, but ferrying out must be done carefully to avoid getting pushed into the large rock at the bottom. At higher levels, it’s best to just skip the eddy and keep to the inside of the turn.
More commonly referred to as Eddy of Woah (or Eddy of Woe, depending on who you ask), the creek makes yet another sharp turn, this time to the left. Most paddlers set up for the main drop in the large eddy on the right side above before ferrying to the left side. The swirly water at the bottom of the drop rivals the shenanigans of artificial whitewater courses, always looking for an unsuspecting paddler’s edges to grab. At levels of 8” or higher, the right side of the drop becomes a water boof and, assuming the paddler hits it keeping the boat flat, this line becomes the cleanest way to run the drop. The channel widens and becomes a game of dodge rock shortly afterwards.
Singer’s is a double drop, the second part of which serving as a popular play spot. This rapid is widely recognized as the halfway mark and many often take a break here on the river right side.
A slight left turn after a small drop leads paddlers into a boulder garden that, as the name would suggest, frequently collects wood. The two main lines are to the far left and far right, though a rarely considered slot and rock slide move exists just to the left of the far right channel.
A long wave train precedes this deceptively nasty hole, which is difficult to see the full force of until the paddler arrives at the scene. It is best to stay river left or far river right to avoid getting into trouble. This hole has a reputation for keeping boats and swimmers, especially with medium and high flows.
A large swirly eddy appears on the river left side of a right-hand bend, shortly after an unnamed Class II below Rothrock Hole. This is the top of Pyramid, widely regarded as the most technical rapid on the Black Mo. Start down the right side through the first drop. One can then either stay off to river right or cut left afterwards for the second drop. Going left takes one toward Pyramid Rock, the triangle-shaped rock that gives the rapid its name. The right side of Pyramid Rock makes for a decent boof at medium flows and above. At 10” and higher, another boof comes in off a rock on the far right side of the second drop. To the right side of that rock is a zig zag slot line and a couple of cool micro eddies to catch for boats shorter than 9 ft in length.
Following a lengthy and sometimes shallow wave train, two large boulders appear on river right, with a narrow channel of water flowing between the two. It’s easy to avoid the boulders to the left side, though most boaters will take the slot if it’s clear of wood. At 8” and above, the left side of this slot between the boulders is the best boof on the creek.
The creek makes a left turn and meets up with Route 53. After a short boogie rapid and deep pool, the channel splits around an island. The left side is narrow, shallow, choked with wood, and simply out of the way. The main channel starts with a small drop into a long wave train. A table rock appears halfway through, with a narrow runnable slot to the far right side for the adventurous.
Along a straight stretch of creek on river left lies a narrow channel that is missed if one blinks. Hidden away and lined with rhodendrons, the Hobbit Trail is quite a unique feature. Nothing difficult awaits boaters here, though there is a cool micro eddy to catch on river left at the bottom. At low flows, the Hobbit Trail is the only navigable channel around the island without grounding out on rock. Beware of wood.
The creek makes a sharp right turn shortly after a popular unnamed surf wave. Several large table rocks appear on the river left side of this turn. The standard line at lower flows is to avoid the rocks to the right side before hustling back left to avoid the low-lying branches on the river right shore. At higher flows, one can simply paddle over top of the final table rock.
The final table rock is easily visible from the roadside, and locals often say that if there’s a trickle of water going over the rock, then the Black Mo is runnable.
One can either take out in a small eddy on the river right side of the island at the confluence with the Red Moshannon, or ferry across to river left after the confluence and take out below the Route 53 bridge.
Jul 25, 2018
Ran this today at 6/10 on the put in bridge gauge and it is a creeking treasure!
May 3, 2011
Ran the final 3.8 miles twice on Sat. April 30 @ 10' on the putin bridge gauge, Beech Creek @ 8.3'
Ran Sun May 1 @ 8' , Beech Creek @ 7.6' These were good levels. Both Beech Creek readings were on a falling gauge. Cut out a river wide strainer just above the takeout. There was one other strainer on this section it is easily seen and easily avoided.
Rand
Sep 1, 2006
There really isn't a reliable gauge on the internet for
the Black. You have to go look at it. There is a
gauge on the river right side of the bridge just below
the put-in. We've run it below 0 on that gauge, but
we were jonesin'. 4'-6' is worth the trip out here.
Peter Smith
...................................Cory~ Beech Creek at 880 cfs and the gauge on the bridge was 4.5
Jun 30, 2006
Edward says (Beech Creek at Monument should be at 7.3 feet). javascript:clickStation('http://waterdata.usgs.gov/nwis/uv?01547950', 331, 191)